Archive | December 2013

Newsflash – Major Lemming Slain in This Year’s Black Friday Sales!

Nothing to Disclose

Hello my adoring public!!  Too much?  Overkill?  Perhaps…

This Black Friday/Small Business Saturday/Cyber Monday weekend I took part in the timeless tradition of purchasing things.  Luckily several lovely indie polish makers indulged me and other indie polish addicts with amazing sales and promotions!  Some of them also had major restocks.  Today I’m going to talk about a polish that I woke up in the middle of the night for!  Yes, seriously, the restock was set for MIDNIGHT PST which is THREE IN THE MORNING where I am, yes I set my alarm, yes I was sad that I only scored one polish…but trust me when I say I’ll be setting my alarm any time there’s a restock and I have disposable funds!

So you’re wondering aren’t you?  You want to know what this amazing, sleep-killing, super polish is don’t you?  Well I’m going to tell you in t-minus 2 seconds!  Allow me to show you My Ten Friends (*SQUEE*) Precog!

photo 3


O.M.G. Readers.  OHEMGEE!  Just LOOK at it!  I can barely contain my excitement.  In fact I’ve gone and looked at these pictures several times since I changed my manicure.  I may or may not have taken the bottle out of the polish drawer several times to just gaze at it as well…I’ll never tell!  Ok details are coming.  Precog is a sky blue jelly based polish with a VERY strong gold shimmer throughout.  Add to the mix a plethora of metallic and holographic teal and gold and silver glitters in a myriad of sizes!  Standouts are the small metallic teal hexes and large holographic gold hexes.  Sparkle city!

photo 4


I tried to catch that gold shimmer in my pictures because in my opinion that is one of the things that makes this polish so very unique and beautiful!  The formula and ease of application were out of this world…(hahahaha see what I did there?)  Pictures show two easy coats with no fishing for glitter, no dragging or streakiness and it reached opacity extremely easily.  I probably could have gotten away with one coat!

I cannot wait to get more My Ten Friends nail polishes and I urge you to follow their facebook page and check out their website to keep up to date on all the happenings and to pick yourself up a bottle of their magic polish as well!

Holiday Nail Art

Some Polishes May Have Been Provided for Review

Why yes readers, I have done some Holiday inspired nail art.  I have rocked a few manis over the past couple of weeks that really got me a lot of attention.  I’d love to share them with you!  Keep in mind that I’m still new to the nail art world so if I can do these manis anyone can!  They just take a little patience and the ability to laugh at your own mistakes!

First up I have a FESTIVE red and white skittle mani

photo (39)

Isn’t it FUN?  I loved this peppermint inspired manicure so much!  On my index and pinkie fingers I stamped a diagonal candy cane stripe.  On my middle finger I used the end of a paint brush to create the large dots.  Last but not least on my ring finger and thumb I did contrasting glitter gradients over red and white!  This one was really an easy manicure to achieve, you could use a striper to create the stripes if you don’t have the stamps, dots are always easy and the glitter gradient is a really easy technique to master as well.

Polishes Used:  Glisten & Glow – Stuck on Blu; Tip Top Nails – Cherry’s In the Snow; Illamasqua – Scorch; Julep – Joelle; Glisten & Glow – HK Girl

I’m really proud of this next one – let me preface by saying this is the second time I’ve tried water marbling and I am utterly pleased with how this turned out.  I have been following Let Them Have Polish for like three years – long before I dipped a brush into lacquer to paint my own nails.  So I was inspired to do a Merry Pinkmas mani in her honor!

photo 1 (3)

Water marbling is not really for the faint of heart, it can be messy and you might cry a little the first time, but once you get the hang of it it’s so much fun and the results are AMAZING!  I learned to water marble by watching video after video by My Simple Little Pleasures (unquestionably the water marble queen!)

photo 2 (3)

I water marbled the pointer, middle, and pinkie fingers and both thumb and ring finger had the fuschia background with the Christmas tree.  Before I added the trees I topped everything off with Big Spoon Lacquers Breaking Atavism to give it a frosty glittery look.  I used tape to block off where I wanted the Christmas tree and then removed the tape while the polish was still wet to give it a clean line.  I then added a pink rhinestone to become the Christmas Tree star!

Polishes Used:  Glisten & Glow – Stuck on Blu; Bondi New York – Fuschia-istic; Tip Top Nails – Meringue Surprise; Big Spoon Lacquers – Breaking Atavism; Big Spoon Lacquers – Christmas Tree in a Bottle; Glisten & Glow – HK Girl

So do ya’ll like the nail art posts?  I kind of like to break the cycle of swatch after swatch!  I rarely just wear a polish plain – I usually do some sort of art or pair it with complementary polishes to create some visual interest!  If you want to see any NOTD pictures I often throw those onto Instagram!

I joined a link party so if you want to join you can as well!

[inlinkz_linkup id=352676]


Daphine Polish – Swatches and Review!

Provided for Honest Review

My loyal patient readers!  I promise to update a little more often but as you are well aware we are deep into the Holiday Season and my level of hecticness (is that a word?  Let’s make it a word.) is through the roof!  There’s baking to be done, presents to buy and wrap, grocery shopping to be done, work to go to…I could go on but I won’t that’ll make a really boring blog post!  Instead lets talk about my stress RELIEF and that’s nail polish!  Seriously I think about nail polish and all my cares fly out the window – usually along with my money but nevermind that! 

Today I have two amazing polishes that were sent to me by Joanne, the creator and owner of Daphine Polish!  Daphine is an up and coming indie line and I foresee many good things for her based on these two polishes!  These come from her Goddesses of the Two Lands collection and are simply lovely!  Seriously these colors are right up my alley and they work extremely well together as well.  It was really hard for me to choose a favorite, so I didn’t.  I will love them both!  Let’s get up close and personal with some Egyptian goddesses shall we?

First up is Isis.  Isis is Osiris’ sister-wife who scoured Egypt for his dismembered body parts after he was murdered by his brother Set.  She along with her sister brought him back to life.  Isis is the matriarch of the Egyptian pantheon and this royal purple really does her justice!

photo 1 (2)

Isn’t she lovely?!  I really fell in love with these two polishes.  Isis is a lovely rich metallic purple that has been slightly blackened so that it’s not an in your face purple but is slightly more muted.  Sprinkled throughout are metallic pink sparkles that just capture the light.  The color is really lovely and classic and is the perfect base for nail art and would great under a complementary glitter topper!

photo 2 (2)

Formula on this one?  Dare I say it…oh heck yeah I’m gonna do it…it’s heavenly.  Yes I went there, I could not resist!  Anyway this polish stays where you put it without any pooling or dragging or flooding but is also not thick or hard to work with at all.  Photos show two coats plus top coat.  It actually dries to a sort of semi-matte finish which is pretty as well but I’m a sucker for a good shiny topcoat.

Polishes Used:  Glisten & Glow – Stuck on Blu; Daphine Polish – Isis; Daphine Polish – Hathor; Glisten & Glow – HK Girl

Up next is Hathor, now Hathor is technically Isis’ daughter in law as Hathor is a fertility goddess and the consort of Horus, the son of Isis and Osiris.  Due to a long drawn out myth that I won’t recount here, sometimes you see that Isis and Hathor have the same or similar attributes in hieroglyphs but they are definitely two separate goddesses!
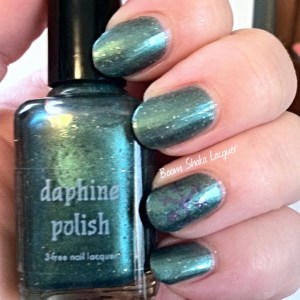
photo 3 (2)

I can see myself reaching for this one again and again.  This is a very gently blackened metallic green-leaning teal polish sprinkled throughout with holographic gold sparkles.  I love every single thing about this color!  Do you see what I mean about the two colors going together so brilliantly?  Seriously the whole Goddess of the Two Lands collection is cohesive and supports the theme beautifully.

photo 4 (2)

Just like Isis, Hathor went on like butter, like gorgeous metallic green/teal butter…sorry I got distracted.  I had no issues with application on either of these and achieved smooth perfection in just two coats.  This one also dries to a semi-matte finish that is not at all unpleasing.  One of the things I don’t talk about much is brushes and bottles.  Usually because I don’t find anything particular to note about them, I mean, all polishes come in bottles with brushes and they are all pretty much the same unless they are particularly horrible or great.  In this case let me just say that I really enjoyed the bottle shape and the length of the cap (it’s a bit longer than standard).  It really allowed me to exercise more precise control and it felt nice during the application.

Polishes Used:  Polishes Used:  Glisten & Glow – Stuck on Blu; Daphine Polish – Hathor; Daphine Polish – Isis; Glisten & Glow – HK Girl

My impression so far of Daphine Polish has me excited and eagerly awaiting the chance to get my grubby paws on some more!  You should definitely check out Daphine Polishes if you’re looking for some new indies to dress your digits!  You can find Daphine Polish on facebook and instagram to keep up with new releases and other information and you can buy these amazing polishes and so many more at her Etsy Shop!

PS:  I used the Royal Lacquer Vynails vinyl decals to create the nail art on these two manicures, I used the negative space of a snowflake as a stencil to get the snowflake on the Hathor manicure and I used the chevron decals as a mask on the Isis manicure.

Royal Lacquer and Vynails Review!

Provided for Review

Hello my darlings!  How are you on this rainy day?  Oh is it not raining where you’re at?  Well it’s certainly raining here.  You know what that means!  It’s time to paint my nails!  Ok so that’s not much different than any other day but let’s roll with it!  I have a fun review for ya’ll today!  I was recently approached by a new indie brand who was wanting to get her name and product out there on the blogosphere and she sent me a lovely package to review!  So we have new indies and her line of vinyl nail decals which come in a simply huge array of decorations for your digits!  Digit Decorations!  Quick someone make something and call it that because I’m on fire!

Ok before I can digress any further let me get right down to business and around here that means pretty polish!  First up we have Evergreen.

photo 1

Evergreen is a green jelly based polish filled with holographic micro-glitter, holographic green hex glitters, and metallic gold square glitters!  I’m really loving the influx of true jelly polishes lately!  Because this polish is a jelly you should expect that it is extremely sheer.  These pictures show five thin coats and you can see there is still a very slight VNL in the pictures though in person the VNL was not noticeable at all.  However the squish factor on this is through the roof!!!  I’m totes digging on the squishiness of this one.

photo 2

 While there is glitter in this polish it is not overwhelming or overpowering.  This is good because I did use so many coats.  There is the appearance that the glitters are curling, but I assure you those hexes are flat.  I did not even need glitter food!  If you are deadset against VNL then you could layer this over another polish but if you do so I’d recommend the dabbing method of application so that you can get the amount of glitter that you like on the nail.

Polishes Used:  Glisten & Glow – Stuck on Blu;  Royal Lacquer – Evergreen; Glisten & Glow – HK Girl

Next up we have Inner Rebel

photo 3 (1)

Inner Rebel is a pristine white crelly based polish sprinkled with tiny hot pink, blue, and green glitters of varying shape as well as a gold holographic flecks throughout.  This polish is so delicate and pretty!  I think I’m starting to see a trend of dainty delicate crelly-based glitter polishes and I’m a fan!

photo 4 (1)

Application was easy breezy on this one – after the first coat I was definitely expecting to need to do three or four coats but this is actually two coats NO undies!  This one did not need glitter food either and a nice shiny topcoat was all that was needed to smooth everything out!

Polishes Used:  Glisten & Glow – Stuck on Blu;  Royal Lacquer – Inner Rebel; Glisten & Glow – HK Girl

Last but definitely not least was my favorite polish of the three!  Allow me to introduce Pearlie!

photo 2 (1)

*Swoon*  Yes that is a stunning slightly blackened purple polish right there!  What my camera could not capture is the AMAZING unique quality that it has.  This purple crelly-based polish is PACKED with itty bitty tiny magenta micro-glitter and teensie tiny holographic aqua flecks.  This makes it seem like the polish is glowing from the inside.  It is so great!

photo 1 (1)

I’ll be honest – after the first coat I was slightly worried that it was going to take several coats to reach opacity.  Readers, I was wrong!!  The second coat brought the opacity and leveled out everything!  This one does dry to a slightly matte finish and the teensie tiny glitters leave it with a somewhat gritty feel.  Because of that and that cute little owl I did use glitter food to give it a glass smooth surface!  Let’s talk about that owl!  Isn’t it adorable?  That my beloved readers is one of the Vynails decals!  Super easy to apply – literally I grabbed a pair of tweezers, peeled it off the sheet, poked out the eyes and belly with a toothpick, and slapped it on the nail!  Easy peasy!  You can also use many of the designs that they have (there are scads of designs) as stencils by placing the negative space on the nail and painting over it then removing it before the polish dries to ensure a clean line.  I foresee tons of manis in my future featuring cute little decals!

Polishes Used:  Glisten & Glow – Stuck on Blu;  Royal Lacquer – Pearlie; Vynail – Vinyl Owl Decal; Nail Pattern Boldness – Glitter Food; Glisten & Glow – HK Girl

Let me save you the trouble of hunting down these lacquers!  You can find out all the happening news on their facebook page and you can purchase Royal Lacquer and Vynails in their Etsy Shop!  Also since this has been posted Tiffany has kindly offered a 10% discount to my readers!  Just enter BOOMSHAKAWESOME at checkout to receive the discount!